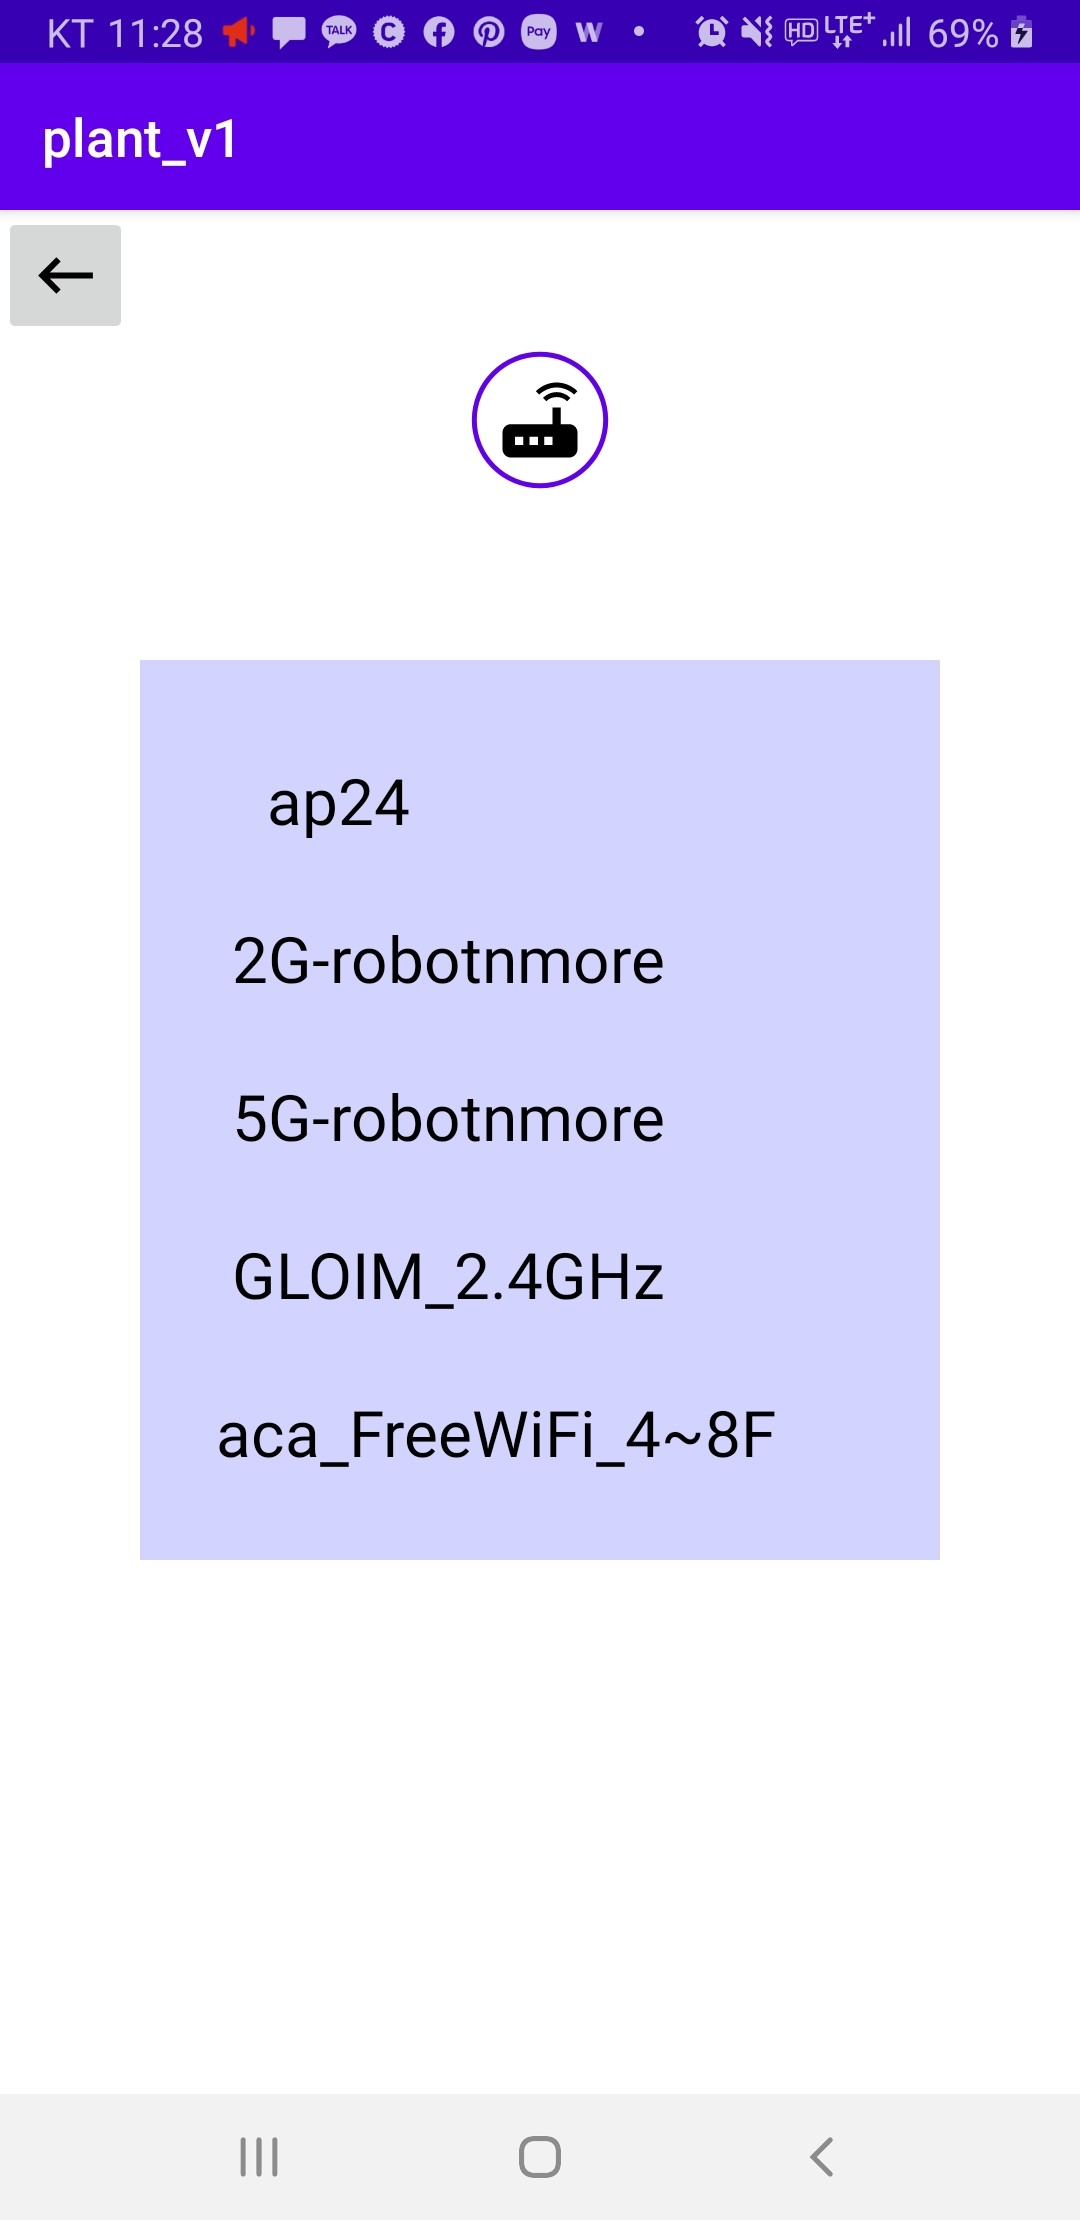
기기의 주변 wifi를 scan하여, 리스트로 띄워보았습니다.
소스는 프래그먼트에서 구현되었습니다.
구현된 소스는,
- 버튼을 누르면 팝업창을 띄우고 wifi scan을 시작한다. Popup Window 사용
- wifi의 ssid 리스트를 띄운다. Recycler view를 사용
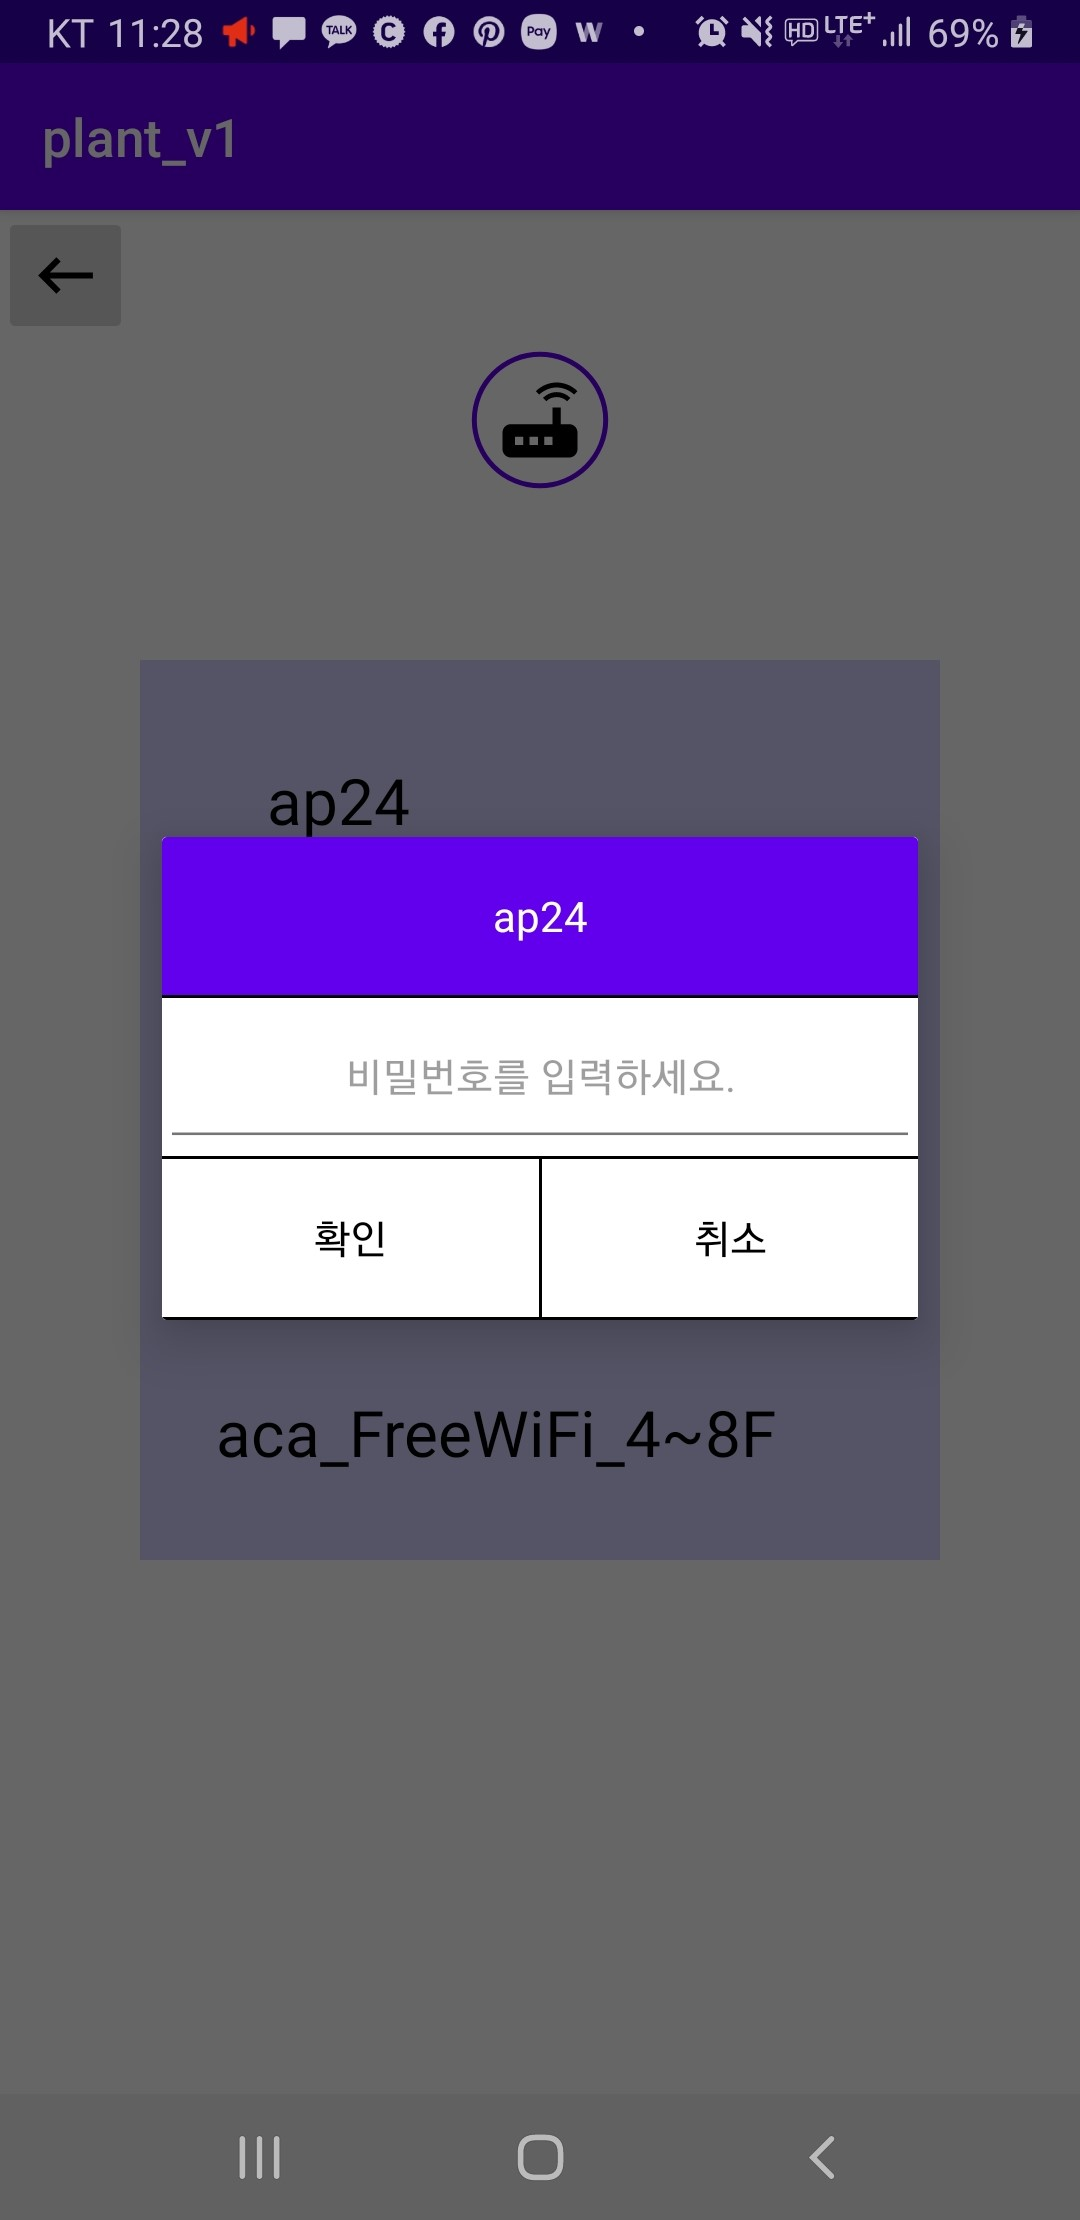
- 리스트중 ssid 하나를 선택하면, 비밀번호를 입력하는 dialog가 나온다. Custom Dialog 구현
- 입력된 ssid와 password를 본래 메인 프래그먼트로 전달하여 저장한다. EventBus 사용
Gradle 추가
    implementation 'org.greenrobot:eventbus:3.0.0' //event bus
    implementation 'com.github.pedroSG94:AutoPermissions:1.0.3' //auto permission
    //noinspection GradleCompatible
    implementation 'com.android.support:recyclerview-v7:28.0.0' //recyclerview
AndroidMenifest.xml 추가
    <uses-permission android:name="android.permission.INTERNET" />
    <uses-permission android:name="android.permission.CHANGE_WIFI_STATE" />
    <uses-permission android:name="android.permission.ACCESS_WIFI_STATE" />
    <uses-permission android:name="android.permission.ACCESS_FINE_LOCATION" />
    <uses-permission android:name="android.permission.CHANGE_NETWORK_STATE" />
    <uses-permission android:name="android.permission.ACCESS_NETWORK_STATE" />
    <uses-permission android:name="android.permission.ACCESS_COARSE_LOCATION " />
wifi scan을 위한 permission을 몽땅 추가해줬습니다.
Main Layout.xml
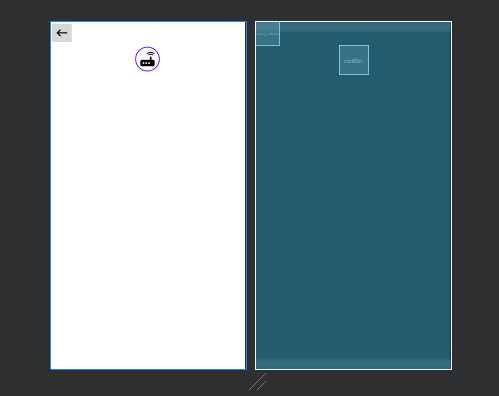
가운데 이미지 버튼을 누르면 popup window가 뜨도록 하였습니다.
popup_wifi.xml
<?xml version="1.0" encoding="utf-8"?>

<LinearLayout xmlns:android="http://schemas.android.com/apk/res/android"
    xmlns:app="http://schemas.android.com/apk/res-auto"
    xmlns:tools="http://schemas.android.com/tools"
    android:orientation="vertical"
    android:layout_width="300dp"
    android:layout_height="500dp"
    android:background="#dccf">

    <androidx.recyclerview.widget.RecyclerView
        android:paddingStart="20dp"
        android:paddingTop="20dp"
        android:id="@+id/rv_recyclerview"
        android:layout_width="match_parent"
        android:layout_height="wrap_content"
        app:layoutManager="androidx.recyclerview.widget.LinearLayoutManager"
        android:orientation="vertical"
        app:layout_constraintBottom_toTopOf="@+id/button"
        app:layout_constraintLeft_toLeftOf="parent"
        app:layout_constraintRight_toRightOf="parent"
        app:layout_constraintTop_toTopOf="parent"
        tools:ignore="RtlSymmetry" />


</LinearLayout>
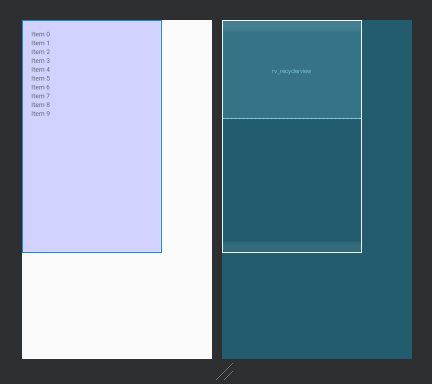
recylcer view를 가지는 popup layout입니다.
wifi_item.xml
<?xml version="1.0" encoding="utf-8"?>
<androidx.constraintlayout.widget.ConstraintLayout xmlns:android="http://schemas.android.com/apk/res/android"
    xmlns:app="http://schemas.android.com/apk/res-auto"
    android:layout_width="match_parent"
    android:layout_height="60dp"
    xmlns:tools="http://schemas.android.com/tools">

    <TextView
        android:id="@+id/tv_wifiName"
        android:layout_width="wrap_content"
        android:layout_height="wrap_content"
        android:textSize="22sp"
        tools:text="Sample text"
        android:textColor="#000"
        app:layout_constraintBottom_toBottomOf="parent"
        app:layout_constraintEnd_toEndOf="parent"
        app:layout_constraintHorizontal_bias="0.123"
        app:layout_constraintStart_toStartOf="parent"
        app:layout_constraintTop_toTopOf="parent"
        app:layout_constraintVertical_bias="0.609" />

</androidx.constraintlayout.widget.ConstraintLayout>
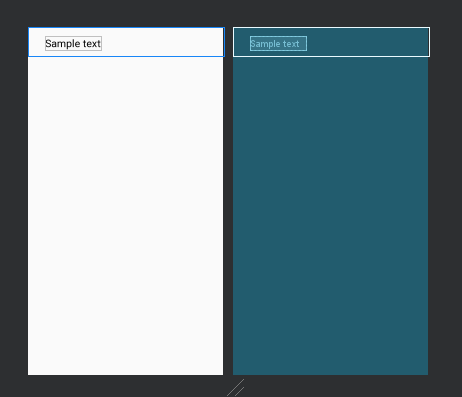
item list layout도 만들어 줍니다.
enter_pw_dialog.xml
<?xml version="1.0" encoding="utf-8"?>
<LinearLayout xmlns:android="http://schemas.android.com/apk/res/android"
    android:orientation="vertical" android:layout_width="match_parent"
    android:layout_height="match_parent"
    android:background="#ffffff">

    <TextView
        android:id="@+id/title"
        android:layout_width="match_parent"
        android:layout_height="60dp"
        android:gravity="center"
        android:textColor="#ffffff"
        android:textSize="16dp"
        android:background="@color/colorPrimary"/>

    <View
        android:layout_width="match_parent"
        android:layout_height="1dp"
        android:background="#000000"/>

    <EditText
        android:id="@+id/message"
        android:layout_width="match_parent"
        android:layout_height="60dp"
        android:gravity="center"
        android:textColor="#000000"
        android:textSize="16dp"
        android:hint="비밀번호를 입력하세요."/>
    <View
        android:layout_width="match_parent"
        android:layout_height="1dp"
        android:background="#000000"/>

    <LinearLayout
        android:layout_width="match_parent"
        android:layout_height="60dp"
        android:orientation="horizontal">

        <Button
            android:id="@+id/okButton"
            android:layout_width="match_parent"
            android:layout_height="60dp"
            android:layout_weight="1"
            android:gravity="center"
            android:text="확인"
            android:textColor="#000000"
            android:textSize="16dp"
            android:background="#ffffff"/>

        <View
            android:layout_width="1dp"
            android:layout_height="match_parent"
            android:background="#000000" />

        <Button
            android:id="@+id/cancelButton"
            android:layout_width="match_parent"
            android:layout_height="60dp"
            android:layout_weight="1"
            android:gravity="center"
            android:text="취소"
            android:textColor="#000000"
            android:textSize="16dp"
            android:background="#ffffff"/>
    </LinearLayout>

    <View
        android:layout_width="match_parent"
        android:layout_height="1dp"
        android:background="#000000"/>
</LinearLayout>
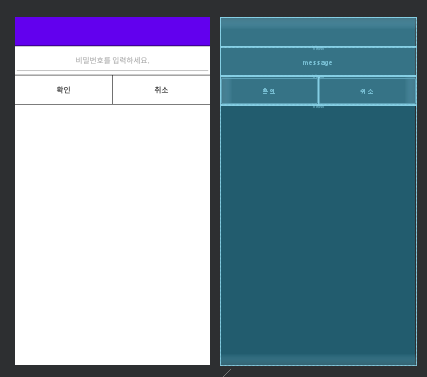
Password를 입력할 custom dialog를 만들었습니다.
tilte은 선택한 ssid를 입력해 줄 것입니다.
wifiAdapter.java
public class wifiAdapter extends RecyclerView.Adapter<wifiAdapter.MyViewHolder> {

    private List<ScanResult> items;
    private Context mContext;


    public wifiAdapter(List<ScanResult> items){

        this.items=items;
    }

    @NonNull
    @Override
    public wifiAdapter.MyViewHolder onCreateViewHolder(@NonNull ViewGroup parent, int viewType) {
        View itemView = LayoutInflater.from(parent.getContext()).inflate(R.layout.wifi_item , parent, false);

        mContext = parent.getContext();

        return new MyViewHolder(itemView);
    }


    @Override
    public void onBindViewHolder(@NonNull MyViewHolder holder, int position) {
        holder.setItem(items.get(position));
    }

    @Override
    public int getItemCount() {
        return items.size();
    }

    public class MyViewHolder extends RecyclerView.ViewHolder {
        public TextView tvWifiName;
        public MyViewHolder(View itemView) {
            super(itemView);

            itemView.setOnClickListener(new View.OnClickListener()
            {
                @Override
                public void onClick(View v)
                {
                    int pos = getAdapterPosition();
                    if (pos != RecyclerView.NO_POSITION)
                    {
                        // click event
                        // ssid 저장
                        String ssid = items.get(pos).SSID;

                        // pw 입력 다이얼로그를 호출한다.
                        // 입력된 pw을 저장한다.
                        wifiDialog customDialog = new wifiDialog(mContext);
                        customDialog.callFunction(ssid);

                    }

                }
            });


            tvWifiName=itemView.findViewById(R.id.tv_wifiName);

        }
        public void setItem(ScanResult item){
            tvWifiName.setText(item.SSID);

        }
    }


}
Recycler View의 adapter입니다.
item을 클릭했을때 리스너를 이용하여 passward를 입력할 dialog를 띄우게 됩니다.
wifiDialog.java
public class wifiDialog {

    private Context context;
    private EditText message;
    private TextView title;
    private Button okButton;
    private Button cancelButton;


      public wifiDialog(Context mContext) {
           this.context = mContext;
     }


    // 호출할 다이얼로그 함수를 정의한다.
    public void callFunction(final String ssid) {


        // 커스텀 다이얼로그를 정의하기위해 Dialog클래스를 생성한다.
        final Dialog dlg = new Dialog(context);
        // 액티비티의 타이틀바를 숨긴다.
        dlg.requestWindowFeature(Window.FEATURE_NO_TITLE);

        dlg.setContentView(R.layout.enter_pw_dialog);

        // 커스텀 다이얼로그의 각 위젯들을 정의한다.
        message = (EditText) dlg.findViewById(R.id.message);
        title = (TextView) dlg.findViewById(R.id.title);
        okButton = (Button) dlg.findViewById(R.id.okButton);
        cancelButton = (Button) dlg.findViewById(R.id.cancelButton);
        title.setText(ssid);


        // 커스텀 다이얼로그를 노출한다.
        dlg.show();

        final String[] pw = new String[1];
        okButton.setOnClickListener(new View.OnClickListener() {
            @Override
            public void onClick(View view) {
                // '확인' 버튼 클릭시
                pw[0] = message.getText().toString();


                Log.d("wifi","wifiDialog\npw : " + pw[0]);
                //ssid와 pw전달
                EventBus.getDefault().post(new WifiData(ssid, pw[0]));
                // 커스텀 다이얼로그를 종료한다.
                dlg.dismiss();
            }
        });
        cancelButton.setOnClickListener(new View.OnClickListener() {
            @Override
            public void onClick(View view) {
                Toast.makeText(context, "취소 했습니다.", Toast.LENGTH_SHORT).show();

                // 커스텀 다이얼로그를 종료한다.
                dlg.dismiss();
            }
        });

    }

    //Event Bus
    public class WifiData {

        public final String ssid;
        public final String pw;

        public WifiData(String ssid, String pw) {
            this.ssid = ssid;
            this.pw = pw;
        }
    }
}
ssid 선택시 password를 입력할 dialog 소스 입니다.
EventBus를통해 선택한 ssid와 입력한 password를 전달해줍니다.
메인 프래그먼트
public class setting extends Fragment {

    private Context mContext;
    private ImageButton btnConnect;
    private PopupWindow mPopupWindow;

    private int mCurrentX = Gravity.CENTER_HORIZONTAL;
    private int mCurrentY = Gravity.CENTER_VERTICAL;

    private WifiManager wifiManager;
    private RecyclerView recyclerView;
    private RecyclerView.Adapter mAdapter;

    final private int REQUEST_CODE_ASK_PERMISSIONS = 123;

    public String wifi_ssid;
    public String wifi_pw ;


    public setting(){

    }

    @Override
    public void onCreate(Bundle savedInstanceState) {
        super.onCreate(savedInstanceState);

        mContext = this.getContext();
        //Event Bus
        try{ EventBus.getDefault().register(this); }catch (Exception e){}
    }

    // Inflate the view for the fragment based on layout XML
    @Override
    public View onCreateView(LayoutInflater inflater, ViewGroup container,
                             Bundle savedInstanceState) {
        View view = inflater.inflate(R.layout.frame_setting,container,false);


        //wifi 버튼
        btnConnect = view.findViewById(R.id.conBtn);
        //권한에 대한 자동 허가 요청 및 설명
        AutoPermissions.Companion.loadAllPermissions((Activity) mContext,101);

        return view;
    }
    @Override
    public void onViewCreated(@NonNull View view, @Nullable Bundle savedInstancdState){
        super.onViewCreated(view,savedInstancdState);

        btnConnect.setOnClickListener(new View.OnClickListener() {
            @Override
            public void onClick(View v) {
            //가운데 버튼 클릭 시 wifi list를 보여줄 popupwindow를 띄운다.
                setMyPopupWindow();
            }
        });


        //get access to location permission
        //wifi scan을 위해 위치 허가를 꼭 받아야함.
        if ( Build.VERSION.SDK_INT >= 23){
            if (ActivityCompat.checkSelfPermission(getContext(), android.Manifest.permission.ACCESS_FINE_LOCATION) !=
                    PackageManager.PERMISSION_GRANTED  ){
                requestPermissions(new String[]{
                                android.Manifest.permission.ACCESS_FINE_LOCATION},
                        REQUEST_CODE_ASK_PERMISSIONS);
                return ;
            }
        }


    }

     @Override
    public void onRequestPermissionsResult(int requestCode, String[] permissions, int[] grantResults) {
        switch (requestCode) {
            case REQUEST_CODE_ASK_PERMISSIONS:
                if (grantResults[0] == PackageManager.PERMISSION_GRANTED) {
                    wifiScan();
                    //Log.d("wifi", "In this");

                } else {
                    // Permission Denied
                    //Log.d("wifi", "permission denied");
                }
                break;
            default:
                super.onRequestPermissionsResult(requestCode, permissions, grantResults);
        }
    }


    //popup window
    private void setMyPopupWindow(){

        LayoutInflater inflater = LayoutInflater.from(mContext);
        View popupLayout = inflater.inflate(R.layout.popup_wifi, null);

        recyclerView = popupLayout.findViewById(R.id.rv_recyclerview);

        popupLayout.setOnTouchListener(new View.OnTouchListener() {

            private float mDx;
            private float mDy;

            @Override
            public boolean onTouch(View view, MotionEvent motionEvent) {
                switch (motionEvent.getAction()) {

                    case MotionEvent.ACTION_DOWN:
                        mDx = mCurrentX - motionEvent.getRawX();
                        mDy = mCurrentY - motionEvent.getRawY();
                        break;
                    case MotionEvent.ACTION_MOVE:
                        mCurrentX = (int) (motionEvent.getRawX() + mDx);
                        mCurrentY = (int) (motionEvent.getRawY() + mDy);
                        mPopupWindow.update(mCurrentX, mCurrentY, -1, -1);
                        break;
                }
                return true;
            }
        });


        mPopupWindow = new PopupWindow(popupLayout, 800, 900, true);
        mPopupWindow.showAtLocation(popupLayout, Gravity.CENTER, 0, 0);
        mPopupWindow.setBackgroundDrawable(new ColorDrawable(getResources().getColor(android.R.color.transparent)));
        mPopupWindow.setOutsideTouchable(true);
        mPopupWindow.setOnDismissListener(new PopupWindow.OnDismissListener() {
            @Override
            public void onDismiss() {
                Log.i("POP-UP", "onDismiss: ");
            }

        });


        wifiScan(); //popupwindow에서 wifi scan을 시작한다.

    }

    public void wifiScan(){
        wifiManager = (WifiManager)
                mContext.getSystemService(WIFI_SERVICE);

        BroadcastReceiver wifiScanReceiver = new BroadcastReceiver() {
            @Override
            public void onReceive(Context c, Intent intent) {
                boolean success = intent.getBooleanExtra(
                        WifiManager.EXTRA_RESULTS_UPDATED, false);
                if (success) {
                    scanSuccess();
                } else {
                    // scan failure handling
                    scanFailure();
                }
            }
        };

        IntentFilter intentFilter = new IntentFilter();
        intentFilter.addAction(WifiManager.SCAN_RESULTS_AVAILABLE_ACTION);
        mContext.registerReceiver(wifiScanReceiver, intentFilter);

        boolean success = wifiManager.startScan();
        if (!success) {
            // scan failure handling
            scanFailure();
        }
    }


    private void scanSuccess() {

        // 스캔 성공시 저장된 list를 recycler view를 통해 보여줌
        List<ScanResult> results = wifiManager.getScanResults();
        mAdapter = new wifiAdapter(results);
        recyclerView.setAdapter(mAdapter);


        Log.d("wifi", "scan success");
        StringBuffer st = new StringBuffer();
        for(ScanResult r : results ){
            Log.d("wifi",""+r);
            st.append(r.SSID);
            st.append("\n");
        }

    }

    private void scanFailure() {
        // handle failure: new scan did NOT succeed
        Log.d("wifi", "scanFailure");
        Toast.makeText(mContext,"wifi scan에 실패하였습니다.", Toast.LENGTH_SHORT).show();
        // consider using old scan results: these are the OLD results!
        List<ScanResult> results = wifiManager.getScanResults();
        // potentially use older scan results ...

    }


	//wifidialog가 끝나면 eventbus를 통해 전달된 ssid와 pw 저장
    @Subscribe(threadMode = ThreadMode.MAIN)
    public void enterPWEvent(wifiDialog.WifiData event){
        wifi_ssid = event.ssid;
        wifi_pw = event.pw;

        Log.d("wifi","setting\nssid : " + wifi_ssid + "   pw : " + wifi_pw);
        mPopupWindow.dismiss();

    }


    @Override
    public void onPause(){
        super.onPause();
    }

    @Override
    public void onStop() {
        super.onStop();

    }
    @Override
    public void onDestroy() {
        super.onDestroy();

    }
}
먼저, 주목할 것은 wifi scan을 사용하는데 위치허가가 꼭 필요하다는 점입니다.
Android Manifest의 permission으론 부족하고, 따로 앱을 실행했을 때 사용자에게 앱의 위치허가를 받도록 하여야 합니다.
허가를 받은 후, 버튼을 누르면 popupWindow를 실행합니다. setMyPopupWindow()를 통해 구현하였습니다.
또한 onTouch메서드를 override하여 팝업창을 터치로 옮길 수 있습니다.
popupWindow()에서 wifiscan()메서드를 통해 wifi scan을 시작합니다.
wifi scan이 성공했을때, 실패했을 때의 이벤트도 처리할 수 있습니다. scanSuccess(), scanFailure()
그후 recycler view의 adapter에 구현된 item 클릭 이벤트를 통해 wifi dialog를 띄우고,
wifi dialog에서 password를 입력받아 저장된 ssid와 password를 Eventbus를 통해 전달받게 됩니다. enterPWEvent(wifiDialog.WifiData event)
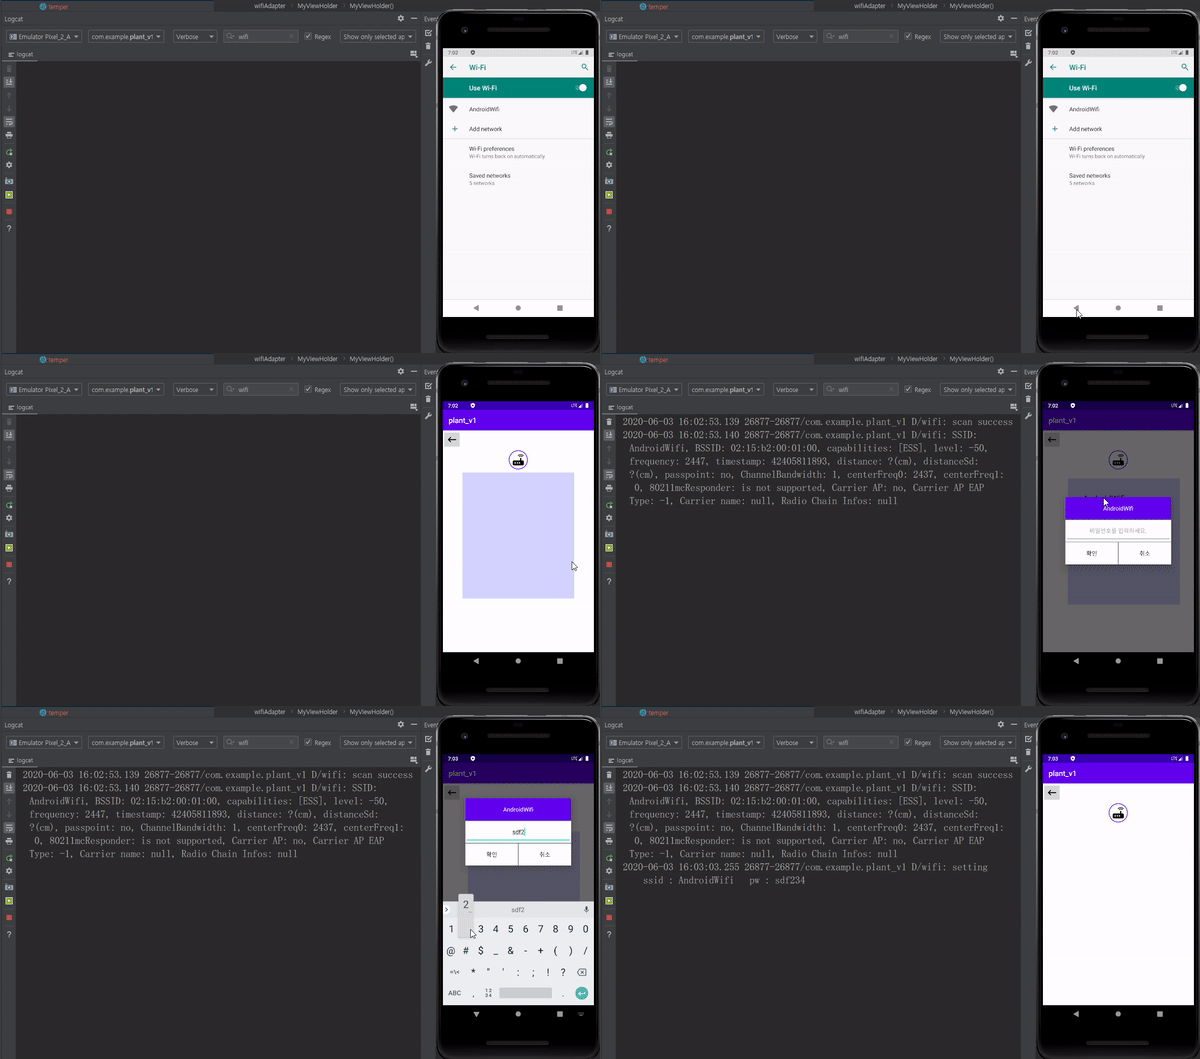
Android Emulator를 통해 실행 해 보았습니다.
참고자료
'Android > 통신' 카테고리의 다른 글
| [안드로이드 Kotlin] BLE(Bluetooth Low Energy) 통신 예제 (39) | 2020.11.02 |
|---|---|
| [안드로이드 java] byte 배열 타입별로 변환하기 ― 수신 프로토콜 처리하기 (0) | 2020.06.05 |
| [안드로이드] 아두이노와 안드로이드 Bluetooth 통신하기 (24) | 2020.05.08 |
| [안드로이드 Java] Bandpass Filter(BPF) 구현하기 ― BPF IIR library, FIR 코드 (2) | 2020.03.04 |

