라즈베리파이 기본 이미지 뷰어로 전체화면 보기, 바꾸기를 해보았는데요.
[Linux/라즈베리파이] - [RPI/Python] 이미지 전체화면 보기, 바꾸기
개인적으로는 키보드의 업버튼으로 이미지를 넘겨 여러 제한이 많았습니다.
그래서 Python GUI인 Tkinter를 사용해 이미지를 전체화면으로 보겠습니다.
이미지 전체화면 GUI 보기
- Tkinter import
import sys
if sys.version_info[0] == 2:  # Just checking your Python version to import Tkinter properly.
    from Tkinter import *
else:
    from tkinter import *

root = Tk()
- 풀스크린 모드 설정, 키 설정
root.attributes("-fullscreen", True)
root.bind("<F11>", lambda event: root.attributes("-fullscreen",
                                    not root.attributes("-fullscreen")))
root.bind("<Escape>", lambda event: root.attributes("-fullscreen", False))
f11을 눌러 풀스크린 모드를 진입 할 수 있도록 하였고, esc키를 눌러 풀스크린 모드를 나갈 수 있도록 해줍니다.
- 이미지 불러오기, 포지션 세팅
#center position
positionRight = root.winfo_screenwidth()/2
positionDown = root.winfo_screenheight()/2

#set image
tk_image1 = PhotoImage(file='/home/poppy/image_view/eyes1.gif')
label = Label(image=tk_image1, bg='black')
label.place(x=positionRight,y=positionDown,anchor=CENTER)

#background color
root.configure(bg='black')
전체화면의 가운데로 이미지를 불러오도록 합니다.
이미지와 gui 배경을 black으로 지정하였습니다.
- mainloop() 실행
root.mainloop()mainloop()를 실행하면, gui가 전체화면으로 실행됩니다. 코드 제일 마지막에 적어줍니다.
애니메이션 gif 이미지 보기

위와 같이 움직이는 gif 파일을 보기 위해서는 gif frame을 재생해야합니다.
after 메서드를 사용하여 frame을 계속 업데이트 할 수 있습니다.
import sys
if sys.version_info[0] == 2:  # Just checking your Python version to import Tkinter properly.
    from Tkinter import *
else:
    from tkinter import *

root = Tk()

#frame
frameCnt = 2
frames = [PhotoImage(file='/home/poppy/image_view/eyes1.gif',format = 'gif -index %i' %(i)) for i in range(frameCnt)]

def update(ind):
    frame = frames[ind]
    ind += 1
    if ind == frameCnt:
        ind = 0
    label.configure(image=frame)
    root.after(100, update, ind)

# fullscreen
# F11: fullscreen toggle, Esc : exit fullscreen mode
root.attributes("-fullscreen", True)
root.bind("<F11>", lambda event: root.attributes("-fullscreen",
                                    not root.attributes("-fullscreen")))
root.bind("<Escape>", lambda event: root.attributes("-fullscreen", False))

#window center position
positionRight = root.winfo_screenwidth()/2
positionDown = root.winfo_screenheight()/2

#set image
label = Label(root, bg='black')
label.place(x=positionRight,y=positionDown,anchor=CENTER)
root.after(0, update, 0)

#background color
root.configure(bg='black')

root.mainloop()
- frameCnt : 이미지 파일의 프레임 갯수를 넣어줍니다.
- root.after(100,update,ind) : 100milliseconds 후에 update 메서드를 ind인자를 넣어 실행합니다.
위 코드를 실행하면 animated gif 파일이 전체화면으로 재생되는것을 볼 수 있습니다.
F11이나 ESC 눌러 전체화면을 나올 수 있도록 하였습니다.
이미지 전환하기
이미지를 전체화면으로 띄우는것 까지 하였는데요, 원하는 상황에 원하는 이미지로 바꾸어 주고 싶습니다.
그런데 코드를 보면 root.mainloop()를 붙여 이후 코드가 무한루프에 빠집니다.
이 코드는 사용자의 입력을 계속 기다리기 위함입니다. 또한 이 코드가 없으면, GUI가 실행되지 않습니다.
해당 GUI가 끝나면, 다음 코드를 실행하게 됩니다.
그래서 원하는 동작을 수행하기 위해(예를 들면 GUI 업데이트나 백그라운드 task 등), 스레드를 사용하여야 합니다.
위에서 frame을 계속 업데이트하기 위해 after 메서드를 사용한 것 처럼요.
그런데 이미지 전환을 위해서, 일정 주기가 아닌 특정 시간 또는 특정 조건이 만족할 때를 백그라운드에서 검사하다가 전환하고 싶습니다.
그래서 많이 사용하는것이 queue입니다. 검사하고 싶은 데이터를 일정 간격으로 queue안에 넣어주고 조건이 맞으면 임의의 값을 쓰레드로 전달합니다.
- 정적인 이미지 전환 (쓰레드 2개)
import sys
if sys.version_info[0] == 2:  # Just checking your Python version to import Tkinter properly.
    from Tkinter import *
else:
    from tkinter import *
import time
import Adafruit_ADS1x15
import queue
import threading


# psd threshold
psd_th = 15000

class MyApp:
    def __init__(self):
        self.tk = Tk()
        # fullscreen
        # F11: fullscreen toggle, Esc : exit fullscreen mode
        self.tk.attributes("-fullscreen", True)
        self.tk.bind("<F11>", lambda event: self.tk.attributes("-fullscreen",
                                    not self.tk.attributes("-fullscreen")))
        self.tk.bind("<Escape>", lambda event: self.tk.attributes("-fullscreen", False))
        #image center position
        self.positionRight = self.tk.winfo_screenwidth()/2
        self.positionDown = self.tk.winfo_screenheight()/2
        #set image
        self.tk_image1 = PhotoImage(file='/home/poppy/image_view/giphy_01.gif')
        self.tk_image2 = PhotoImage(file='/home/poppy/image_view/eyes1.gif')
        self.imageNum = 1
        self.label = Label(image=self.tk_image1, bg='black')
        self.label.place(x=self.positionRight,y=self.positionDown,anchor=CENTER)
        #background color
        self.tk.configure(bg='black')

    def start_read_psd(self):
        self.q1 = queue.Queue()
        readPsd(self.q1).start()
        self.tk.after(0,self.check_psd)

    def changeImage(self):
        if self.imageNum==1 :
            self.imageNum = 2
            self.label.configure(image=self.tk_image2)
            self.label.image = self.tk_image2
        else :
            self.imageNum = 1
            self.label.configure(image=self.tk_image1)
            self.label.image = self.tk_image1

    def check_psd(self):
        try:
            value1 = self.q1.get(0)
            print(value1)
            if value1 > psd_th:
                print("over!!")
                self.changeImage()
                time.sleep(0.5)
        except queue.Empty:
            pass
        finally:
            self.tk.after(100,self.check_psd)


class readPsd(threading.Thread):

    def __init__(self,q1):
        threading.Thread.__init__(self)
        self.q1 = q1
        # ads1115(adc) init
        self.adc = Adafruit_ADS1x15.ADS1115()
        # psd gain
        self.GAIN = 1

    def run(self):
        # read psd
        while True:
            time.sleep(0.1)
            # Read all the ADC channel values in a list.
            values = [0]*4
            for i in range(4):
                # Read the specified ADC channel using the previously set gain value.
                values[i] = self.adc.read_adc(i, gain=self.GAIN)
            # put data0 in queue
            self.q1.put(values[0])


root = MyApp()
root.start_read_psd()
root.tk.mainloop()
MyApp class가 생성될때 tkinter GUI와 관련된 것을 전부 세팅하였습니다.
그다음 start_read_psd()를 실행하여 psd센서의 값을 계속 읽어오는 스레드를 실행하는데요.
psd센서 사용이 궁금하다면 관련 포스팅 참고해주세요.
[Linux/라즈베리파이] - [RPI/Python] 라즈베리파이 PSD 센서 사용 하기 ― ADS1115로 아날로그 값 읽기
이 스레드가 돌아가는 readPsd class를 보시면 4개의 adc중 하나의 채널(0번)의 값을 받아와 queue에 계속 넣습니다.
그리고 check_psd()를 100millisecond마다 실행하여 queue의 값을 검사합니다. self.tk.after(100,self.check_psd)
그리고 일정 값 이상이 되면, 이미지를 바꾸어줍니다. changeImage()
- 움직이는 gif 이미지 전환 (쓰레드 3개)
import sys
if sys.version_info[0] == 2:  # Just checking your Python version to import Tkinter properly.
    from Tkinter import *
else:
    from tkinter import *
sys.path.append("/home/poppy/pyenv/lib/python3.7/site-packages")

import time
import Adafruit_ADS1x15
import queue
import threading


# psd threshold
psd_th = 15000


class MyApp:
    def __init__(self):
        self.tk = Tk()
        # fullscreen
        # F11: fullscreen toggle, Esc : exit fullscreen mode
        self.tk.attributes("-fullscreen", True)
        self.tk.bind("<F11>", lambda event: self.tk.attributes("-fullscreen",
                                    not self.tk.attributes("-fullscreen")))
        self.tk.bind("<Escape>", lambda event: self.tk.attributes("-fullscreen", False))
        #image center position
        self.positionRight = self.tk.winfo_screenwidth()/2
        self.positionDown = self.tk.winfo_screenheight()/2
        #set image
        self.frame1Cnt = 2
        self.frame2Cnt = 10
        self.img1Frames = [PhotoImage(file='/home/poppy/image_view/eyes1.gif',format = 'gif -index %i' %(i)) for i in range(self.frame1Cnt)]
        self.img2Frames = [PhotoImage(file='/home/poppy/image_view/eyes3.gif',format = 'gif -index %i' %(i)) for i in range(self.frame2Cnt)]
        self.imageNum = 1 # current Image
        self.label = Label(self.tk, bg='white')
        self.label.place(x=self.positionRight,y=self.positionDown,anchor=CENTER)
        # frame index
        self.ind1 = 0
        self.ind2 = 0
        self.tk.after(0, self.updateGifImg)
        # background color
        self.tk.configure(bg='white')


    def updateGifImg(self):
        if self.imageNum==1:
            frame = self.img1Frames[self.ind1]
            self.ind1 += 1
            if self.ind1 == self.frame1Cnt:
                self.ind1 = 0
            self.label.configure(image=frame)
        else:
            frame = self.img2Frames[self.ind2]
            self.ind2 += 1
            if self.ind2 == self.frame2Cnt:
                self.ind2 = 0
            self.label.configure(image=frame)
        self.tk.after(100, self.updateGifImg)

    def start_read_psd(self):
        self.q1 = queue.Queue()
        readPsd(self.q1).start()
        self.tk.after(0,self.check_psd)

    def check_psd(self):
        try:
            value1 = self.q1.get(0)
            print(value1)
            if value1 > psd_th:
                print("over !!")
                self.changeImage()
                time.sleep(0.5)
        except queue.Empty:
            pass
        finally:
            self.tk.after(100,self.check_psd)


    def changeImage(self):
        if self.imageNum==1 :
            self.imageNum = 2
        else :
            self.imageNum = 1


class readPsd(threading.Thread):

    def __init__(self,q1):
        threading.Thread.__init__(self)
        self.q1 = q1
        # ads1115(adc) init
        self.adc = Adafruit_ADS1x15.ADS1115()
        # psd gain
        self.GAIN = 1

    def run(self):
        # read psd
        while True:
            time.sleep(0.1)
            # Read all the ADC channel values in a list.
            values = [0]*4
            for i in range(4):
                # Read the specified ADC channel using the previously set gain value.
                values[i] = self.adc.read_adc(i, gain=self.GAIN)
            # put data in queue
            self.q1.put(values[0])


root = MyApp()
root.start_read_psd()
root.tk.mainloop()
움직이는 gif 이미지를 보여야 하므로 frame을 실행하는 스레드를 추가하여 updateGifImg()
3개의 스레드가 돌아가는 구조입니다.
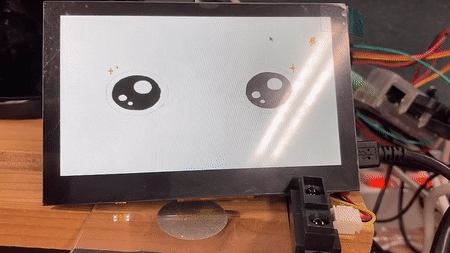
- 결과
'그 외 코드 > Python' 카테고리의 다른 글
| 거리계산 함수 - 유클라디안 / 코사인 유사도 (0) | 2019.12.16 |
|---|---|
| Pandas DataFrame 문자열 일괄 대문자로 변경하기 (0) | 2019.12.16 |
| 파이썬 %명령어, 매직명령어 (0) | 2019.12.16 |
| Pandas를 이용한 데이터 전처리 방법 - 파일 읽기, 누락값 처리 (0) | 2019.12.06 |


